If you’ve ever worked with the Expo and later realised that it’s not enough and decided to eject with Expokit, then you must be familiar with the frustration that comes along when you’re building a production-level app. Keeping multiple apps for developers, testers and end-users can be tricky and requires your app to manage environment variable inside your Javascript realm, configs inside your native realms and some of the configs in your App.json. On top of it, the behaviour of the entry point being App.json of the detached app is such a pain in the **s. The detached project doesn’t treat your App.json file the same way your usual expo project does. In a nutshell, some of the configs are pick up from App.json and others are from Native files. You can read more about it here Expo App.json.
Anyway, at Decabits, we’ve had to face a similar challenge and decided to take the matter in our hands with whatever help we got from the expo side.
Today, I’m gonna show you how we managed multiple environment in Expokit project using Expo Release channels (which by the way is awesome just like all the other support feature Expo-CLI give you to make life a little less difficult), Expo configs flag and a shell script we wrote to make native changes to native files like app name, bundle id, google services files, release channel for published Url and other native configs.
Let’s begin with managing runtime environment variables inside our JS code using the Expo Release Channel.
We maintained our environment variable in an Environment.js file similar to the conventional fashion of maintaining .env file.
This is how the environment.js file looks like-
import Constants from 'expo-constants';

const ENV = {
  dev: {
    firebase: {
      config: {
        apiKey: ‘*********************************************’,
        authDomain: ‘*********************************************’,
        databaseURL: ‘*********************************************’,
        projectId: ‘*********************************************’,
        storageBucket: ‘*********************************************’
        messagingSenderId: ‘*********************************************’
      },
    },
    google: {
      iosClientId: ‘*********************************************’,
    },
    facebook: {
      AppId: *********************************************’,
    },
    elasticeSearchUrl: ‘*********************************************’,
    apnsSendPushNotificationUrl: ‘*********************************************’,
  },

  staging: {
    firebase: {
      config: {
        apiKey: ‘*********************************************’,
        authDomain: ‘*********************************************’,
        databaseURL: ‘*********************************************’,
        projectId: ‘*********************************************’,
        storageBucket: ‘*********************************************’
        messagingSenderId: ‘*********************************************’
      },
    },
    google: {
      iosClientId: ‘*********************************************’,
    },
    facebook: {
      AppId: *********************************************’,
    },
    elasticeSearchUrl: ‘*********************************************’,
    apnsSendPushNotificationUrl: ‘*********************************************’,
  },

  prod: {
    firebase: {
      config: {
        apiKey: ‘*********************************************’,
        authDomain: ‘*********************************************’,
        databaseURL: ‘*********************************************’,
        projectId: ‘*********************************************’,
        storageBucket: ‘*********************************************’
        messagingSenderId: ‘*********************************************’
      },
    },
    google: {
      iosClientId: ‘*********************************************’,
    },
    facebook: {
      AppId: *********************************************’,
    },
    elasticeSearchUrl: ‘*********************************************’,
    apnsSendPushNotificationUrl: ‘*********************************************’,
  },
};

const getEnvVars = (env = Constants.manifest.releaseChannel) => {
  if (__DEV__) {
    return ENV.dev;
  } else if (env === 'staging') {
    return ENV.staging;
  } else if (env === 'prod') {
    return ENV.prod;
  } else {
    return ENV.dev;
  }
};

export default getEnvVars;
The heart of this entire JS file lives in the very first line “expo-constants” which is an Expo API that gets you the release channel from native configs code at runtime.
Till now, we’ve managed to get all the environment variables that are required at runtime in our JS code for our business logic and service instances.
Based on the native configuration of Release channel key in your App, Javascript will pick the environment respectively.
Now, we need to address the configs our App picks up from App.json for different environments. For this we decided to use Expo-CLI –config flag which basically tells your app the path to your App.json file in case you wish to keep more than one or at any different location other than the default being root. We need to maintain multiple App.json for respective environments. So now at the time of expo publish or even expo start we start passing the -—config flag to serve respective App.json for different cases.
Note - if you’re using the latest expo version for Google sign-in and other Google services, then you must need to go through this step to configure your project with right ‘reservedClientId’ for iOS and ‘googleServicesFile’, ‘certificateHash’ for Android.
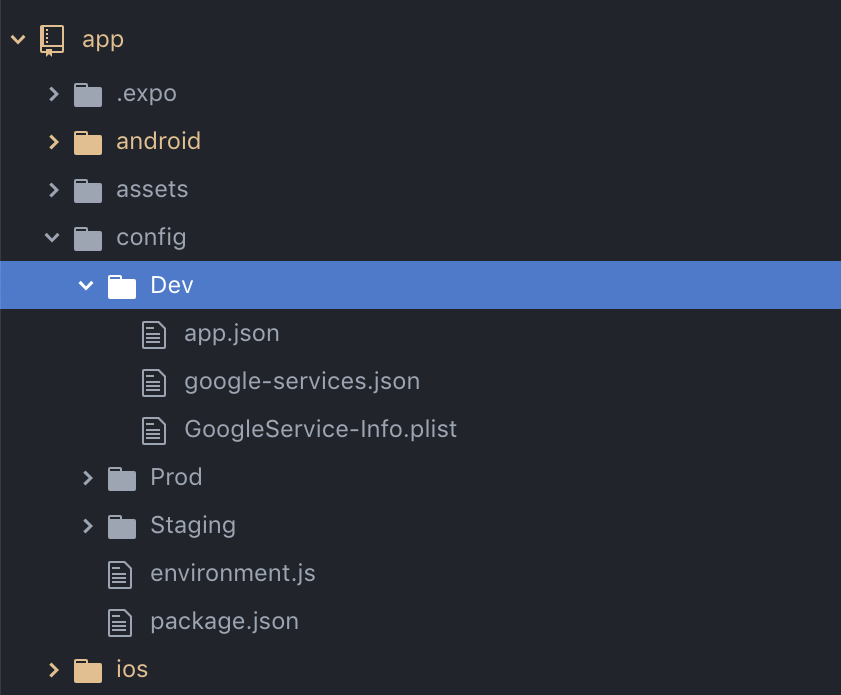
Now the last step would be to change the native configuration of the app but before that, let’s see how we structured our config folder with Environment.js, App.json, and different Google services files for multiple firebase apps corresponding to each environment.

Each Dev, Staging and Prod directory contain their respective App.json, Google-service.json(Android) and GoogleService-Info.plist(iOS) file and at the root of config folder we kept our Environment.js file and if you’re thinking what a package.json file is doing here then cheers, to that highly curious mind of yours. The answer is it’s just a config file for Module aliasing just like you’d do with webpack if you’ve ever done that. Now if you’re wondering what google services files are doing here, you are on the right path. The answer would be -
- App.json should be configured with a path to your service file for android.
- These files also need to be present in your native directories for multiple env. So our shell script basically reads these files from here and writes to the one present on the native side.
Finally, coming to changing our app name, bundle id, release channel key, google services file and other files respective to multiple environments, this is the shell script we wrote -
sed -i '' -e 's/public static final String RELEASE_CHANNEL = .*/public static final String RELEASE_CHANNEL = "'$1'";/g' ./android/app/src/main/java/host/exp/exponent/generated/AppConstants.java;

if [ $1 == "prod" ]
then
    #If we are making Prod app
    sed -i '' -e 's/<string name="app_name">.*/<string name="app_name">CatchVybz<\/string>/g' ./android/app/src/main/res/values/strings.xml;
    sed -i '' -e '/<key>CFBundleDisplayName<\/key>/ {' -e 'n; s/<string>.*<\/string>/<string>CatchVybz<\/string>/' -e '}' ./ios/catchvybz/Supporting/info.plist;

else
    #For build other than Prod
    sed -i '' -e 's/<string name="app_name">.*/<string name="app_name">CatchVybz-'$1'<\/string>/g' ./android/app/src/main/res/values/strings.xml;
    sed -i '' -e '/<key>CFBundleDisplayName<\/key>/ {' -e 'n; s/<string>.*<\/string>/<string>CatchVybz-'$1'<\/string>/' -e '}' ./ios/catchvybz/Supporting/info.plist;
fi

sed -i '' -e "s/applicationId .*/applicationId 'com.packagename.name_$1'/g" ./android/app/build.gradle;
sed -i '' -e '/<permission/ {' -e 'n; s/android:name=.*/android:name="com.packagename.name_'$1'.permission.C2D_MESSAGE"/' -e '}' ./android/app/src/main/AndroidManifest.xml;
sed -i '' -e 's!<uses-permission android:name="com.packagename.name.*!<uses-permission android:name="com.packagename.name_'$1'.permission.C2D_MESSAGE" />!g' ./android/app/src/main/AndroidManifest.xml;
sed -i '' -e 's!<data android:scheme="com.packagename.name.*!<data android:scheme="com.packagename.name_'$1'" android:path="oauthredirect"/>!g' ./android/app/src/main/AndroidManifest.xml;

GOOGLE_SERVICES_KEYS=$(sed -n  's:.*<string>\(.*\)</string>.*:\1:p' config/$1/GoogleService-info.plist)
REVERSED_CLIENT_ID=(${GOOGLE_SERVICES_KEYS[@]})
echo "${REVERSED_CLIENT_ID[1]}"

sed -i '' -e '/<key>releaseChannel<\/key>/ {' -e 'n; s/<string>.*<\/string>/<string>'$1'<\/string>/' -e '}' ./ios/catchvybz/Supporting/EXShell.plist;
sed -i '' -e '/<key>CFBundleIdentifier<\/key>/ {' -e 'n; s/<string>.*<\/string>/<string>com.packagename.name-'$1'<\/string>/' -e '}' ./ios/catchvybz/Supporting/info.plist;
sed -i '' -e '/<key>CFBundleURLTypes<\/key>/ {' -e 'n;n;n;n;n;n; s/<string>.*<\/string>/<string>'${REVERSED_CLIENT_ID[1]}'<\/string>/' -e '}' ./ios/catchvybz/Supporting/info.plist;
sed -i '' -e '/<string>OAuthRedirect<\/string>/ {' -e 'n;n;n; s/<string>.*<\/string>/<string>com.packagename.name-'$1'<\/string>/' -e '}' ./ios/catchvybz/Supporting/info.plist;
sed -i '' -e 's/PRODUCT_BUNDLE_IDENTIFIER = .*/PRODUCT_BUNDLE_IDENTIFIER = com.packagename.name-'$1';/g' ./ios/catchvybz.xcodeproj/project.pbxproj;

cp -fr config/$1/google-services.json android/app
cp -fr config/$1/GoogleService-info.plist ios/catchvybz/Supporting
Now, whenever we need to install a React Native third party lib which depends upon a new native dependency, it would require us to make a new build. Every time we do that, we have to simply run the shell command from the root of our folder -
./updateReleaseChannel [envName]
And that’s it. We now have a diff project with all the configs at the right place.
And whenever we only need to make a JS side change, we simply publish the Bundle with –release-channel and –config flag to ensure the right app is getting the right OTA update.
That’s it for this blog. I hope you find it useful and if you did, stay tuned. In our next blog, we’re going to see how we managed multiple environments for Firebase cloud functions.
